Pages

27.4.11

violet jelly


as i was walking around the garden during the gorgeously sunny easter holiday (have i been insufferable enough about that yet?) i noticed that there were loads of little wild violets blooming here and there in the lawn.  violets make me think of my grandmother, who loved them and all of the little bouquets i picked for her and the assortment of tiny vases she had to put them in.


but instead of picking bouquets, i decided to try to make violet jelly. i'd seen a couple of pins about it on pinterest and so i did a bit of investigation and then figured out my own recipe (of course).  plus it totally satisfied my desire for found food. and the violets are quite fetching, don't you think? i just generally enjoyed spending time with them.


the violets in our garden come in a rather wide variety of shades of purple and even white, as you can see here. i think it made my resulting jelly less purple and more pinkish than some i saw online, but it does taste quite delicately fragrant and wonderful. i tried to stick only to the most purple violets, but i had to use a few of the variegated ones in order to have enough.


here's what you need:

violet jelly

2 cups of violets (for my metric friends, fill a 500ml cup with violets) 
2 cups of water (500ml)
4 cups of sugar (1 kilo)
1 packet of pectin (or use pectin sugar, like i did, if it's available near you)
the juice of 1 lemon

pick your violets. violets are tiny, so this actually takes awhile. enlist the help of a child if you have one nearby.  try to pick just the flowers, don't get stems in if you can help it.  put the violets in a glass bowl and pour 2 cups of boiling water over them. cover the bowl and set it out of the way - preferably overnight.  the next day, strain the violets in a strainer.


i did a second straining with a bit of cheesecloth, as the strainer didn't catch all of the small bugs that were in with the violets. i hadn't washed the violets at all before i began, not wanting to lose any precious potential color and because i knew i'd be straining them well.

the resulting violet "tea" was a lovely teal green shade in my case. don't be alarmed by this, as the lemon will purple it right up.  combine the "tea," the sugar, the pectin and the lemon juice in a heavy-bottomed saucepan and heat it to boiling on the stove. my pectin sugar advised me to let it boil 3-5 minutes once it came to a boil. it requires some stirring, but not really constant stirring, tho' keep an eye on it, as it can scorch.


prepare your jars by sterlizing them (this can be done on a very hot cycle in your dishwasher if your dishwasher does super hot), or you can lower the into a pan of boiling water. i usually "cook" the lids in a separate pot of boiling water so they go directly from the pan to the jar. ladle the jelly into your prepared jars while it's still piping hot (i got 3 little jars + a partial jar from my batch), skimming off any scum that forms on top (it's normal that some will form). put the lids on immediately. they should seal within an hour or so and if they don't, use that jar right away.  as you can see in this photo, i experimented with putting a few new, fresh violets into the jelly as i poured the jelly in, but that didn't work as well as i'd have liked (if i'm honest, they look a little bit like flies).


the jelly has a delicate fragrant taste that i suppose is just how violets taste. i've had it on toast so far, but was thinking about using some in some springy cookies or as a layer between slices of angel food cake with strawberries on it (the strawberry plants are almost setting blooms with all this sunshine). yummy.

23.4.11

On The Window, Through The Window

Since not everyone can have the glorious weather that is now being appreciated in Denmark (*wink*)  I have found that we have spent most of the last two soaking weeks in doors when we long to be accomplishing things in the garden.  The kids have completed a couple of eco-projects that I thought were really neat ideas, easy to do and allow for you to dream of warmer and drier days as we gaze out our windows.

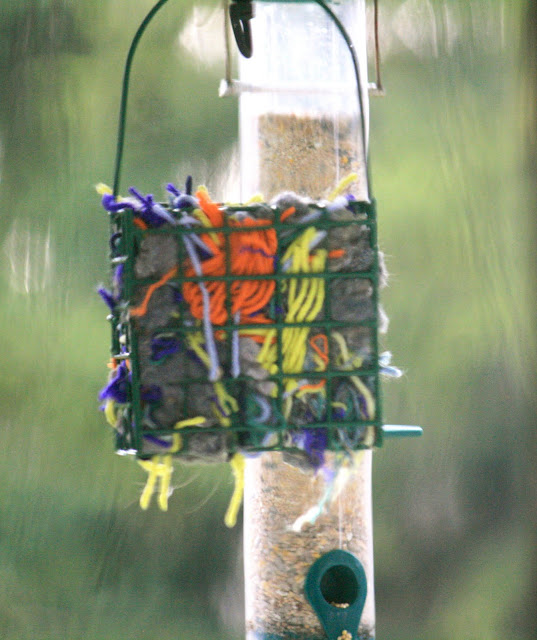
The first is this little suet basket.  It has been filled with scraps of yarn and loads of dryer lint and hung out next to one of our bird feeders on the porch.  The little ones grab bits from here to pad their nests.  Fun for the kids to watch, and another lure for avian photo ops.
This second one is a great way to show your kids (or grand kids, or nieces and nephews, or you for that matter), the way that a seed grows.  Take a 8 1/2 X 11 business card sheet and punch two holes in the top to insert little suction cups.  Then, fill each of the business card spaces 3/4 of the way full with potting soil.  Plant any little seed in each pouch and then water (we use a turkey baster to do the watering).  Hang in the window and watch the seeds germinate, roots develop, and little plants begin.  You can then transplant them wherever you wish.  This could be a great way to begin your kitchen herbs!
Finally, not so much a craft as an activity that was sent home from school with Sidney this week.  Nothing fills my heart more than to see something of what we are trying to instill in our kids dovetailed in what they learn at school.  This week, every fourth grader was sent home with a baby sugar maple tree (Wisconsin's state tree).  They were taught about planting a legacy and how to plant and care for the tree in honor of Arbor Day, which is next Friday.  Our ground is so saturated from rain, we can not plant it yet, but we are keeping the roots moist and if this rain doesn't stop by tomorrow are going to plant it in a big bucket until we can get it in the ground. What a neat thing to come home from school!

Happy Weekend!

19.4.11

we're going to beekeeping (lessons that is)!

so that's what they mean by "busy as a bee."
in denmark, there's an association for most anything you'd like to do. during the darkest days of last winter, in the throes of dreams of long golden summer days, we joined the national beekeeping association. and they assigned us to a local chapter.  a few weeks ago, a very nice elderly man came to the door and welcomed me to the club. he also told me a whole lot about beekeeping - queens and drones and changing out honey-laden frames - about 65% of which i understood due to his strong local accent. but i got a very good vibe from him - he was kind and friendly and clearly loves bees.

husband looking rather fetching in bee headgear
i told the nice man that we were total beginners and would very much like to have lessons in beekeeping. i also said that if he came across anyone selling all of their bee supplies for a good price, we'd be interested. he regaled me with tales of others who had gotten their supplies for a good price and assured me he would be able to find a similar deal for us.

in the height of summer, a frame like this can hold 2.5 kilos of honey!
last evening was the first class. there were several other bee newbies, tho' they were all well past retirement age. they seemed charmed that "youngsters" like us were interested. the club has a skolebigård ("school bee farm" if i directly translate)  at a ramshackle teeny little museum in an equally tiny town that's not much else. last evening, we checked all of the hives there, to see how the bees had come through the winter. actually, we watched, as the guys who knew about it checked them. he showed us the difference between combs that were full of eggs and those that were full of honey. 


again, i got only about 65% of it, but husband was there to catch the important bits. i was mostly taking pictures and feeling that close-to-nature feeling that accompanies such activities. it was an absolutely glorious evening, the sun doesn't set 'til 9 or so these days and it was warm and beautiful. the trees were full of bird song and the bees were humming, tho' they seemed very tame. the little smoker helped, but i also think it helped that the main bee handler was as calm around them as could be. he did warn that if there was a thunderstorm, you should just pack up and go home because it made the bees very agitated.

the guy on the right is the one who came to the door - he knows his bees
so we're going to be getting two of these bee "stalls" just after easter. and then our own bee adventure will begin. i'll definitely keep you posted on how it's going.

16.4.11

strawberries & rhubarb

when you have a new place, it's always an adventure to see what's coming up around the garden, planted there by those who came before. last year, when we arrived, we saw that there were loads of strawberries. and we heard from neighbors that those who lived here before had actually sold strawberries. we weren't so interested in doing that, but we were interested in saving some of the shoots that the strawberries send out and thereby getting new (and free) strawberry plants. so last year, that was pretty much the extent of our efforts. we cleared a long row and tucked those little shoots into small plastic pots that we embedded into the sandy soil. now it's time to move all of those new little plants with their fine roots over to a new bed. and so we did that this week.


we prepared a bed, taking as many of the weed roots out as possible and turning in lots of horse poo (tho' not too much, because it is rich and can actually burn your plants). we have extremely sandy soil, which makes for great drainage, but isn't the most nutrient-rich soil, so fertilizing is important. we laid down a sheet of black fiber to try to help against the weeds (we have persistent crab grass), then cut holes in for the strawberries and moved the little plants (my hands were dirty and i failed to photograph this part). as you can see, we've stretched a plastic tunnel across it, hoping to both protect from the chilly nights that are yet to come (tho' strawberries can actually tolerate quite a lot of cold) and hoping to hurry them up a little bit - hopefully by a couple of weeks! we have another even longer bed that's not covered, so it's an experiment in seeing whether the tunnel helps and how much.

rhubarb hiding in the grass
while we were at it, we decided to move some of the rhubarb that were here when we bought the place, over to a more suitable place near the other edible perennials (like asparagus).  i thought last summer when we arrived that there were 12 rhubarb plants, but it proved there were far more, especially as we we were able to separate some obviously very old roots.

ancient, well-established rhubarb root
seeing these old and very established roots was somehow so satisfying. i felt a little bit like i was next in a long historical line. weird, how seeing a root provoked that feeling in me. a very base and primordial feeling of being very close to the earth. wonderful.

row 1 of the rhubarb (and husband with his precise lines)
and now there are two rows of rhubarb next to a long row of asparagus. they'll no doubt be quite relieved not to have to compete with all that grass anymore. tho' they'll probably be a bit shocked by their move, rhubarb is extremely hardy and  will undoubtedly come back very quickly.

and that's what happened in our sustainable life this week.